Photography (advice, tips&tricks or simply to show off your photoskills with/without audio gear)

NP and sure.
So ill break it down in a similar way

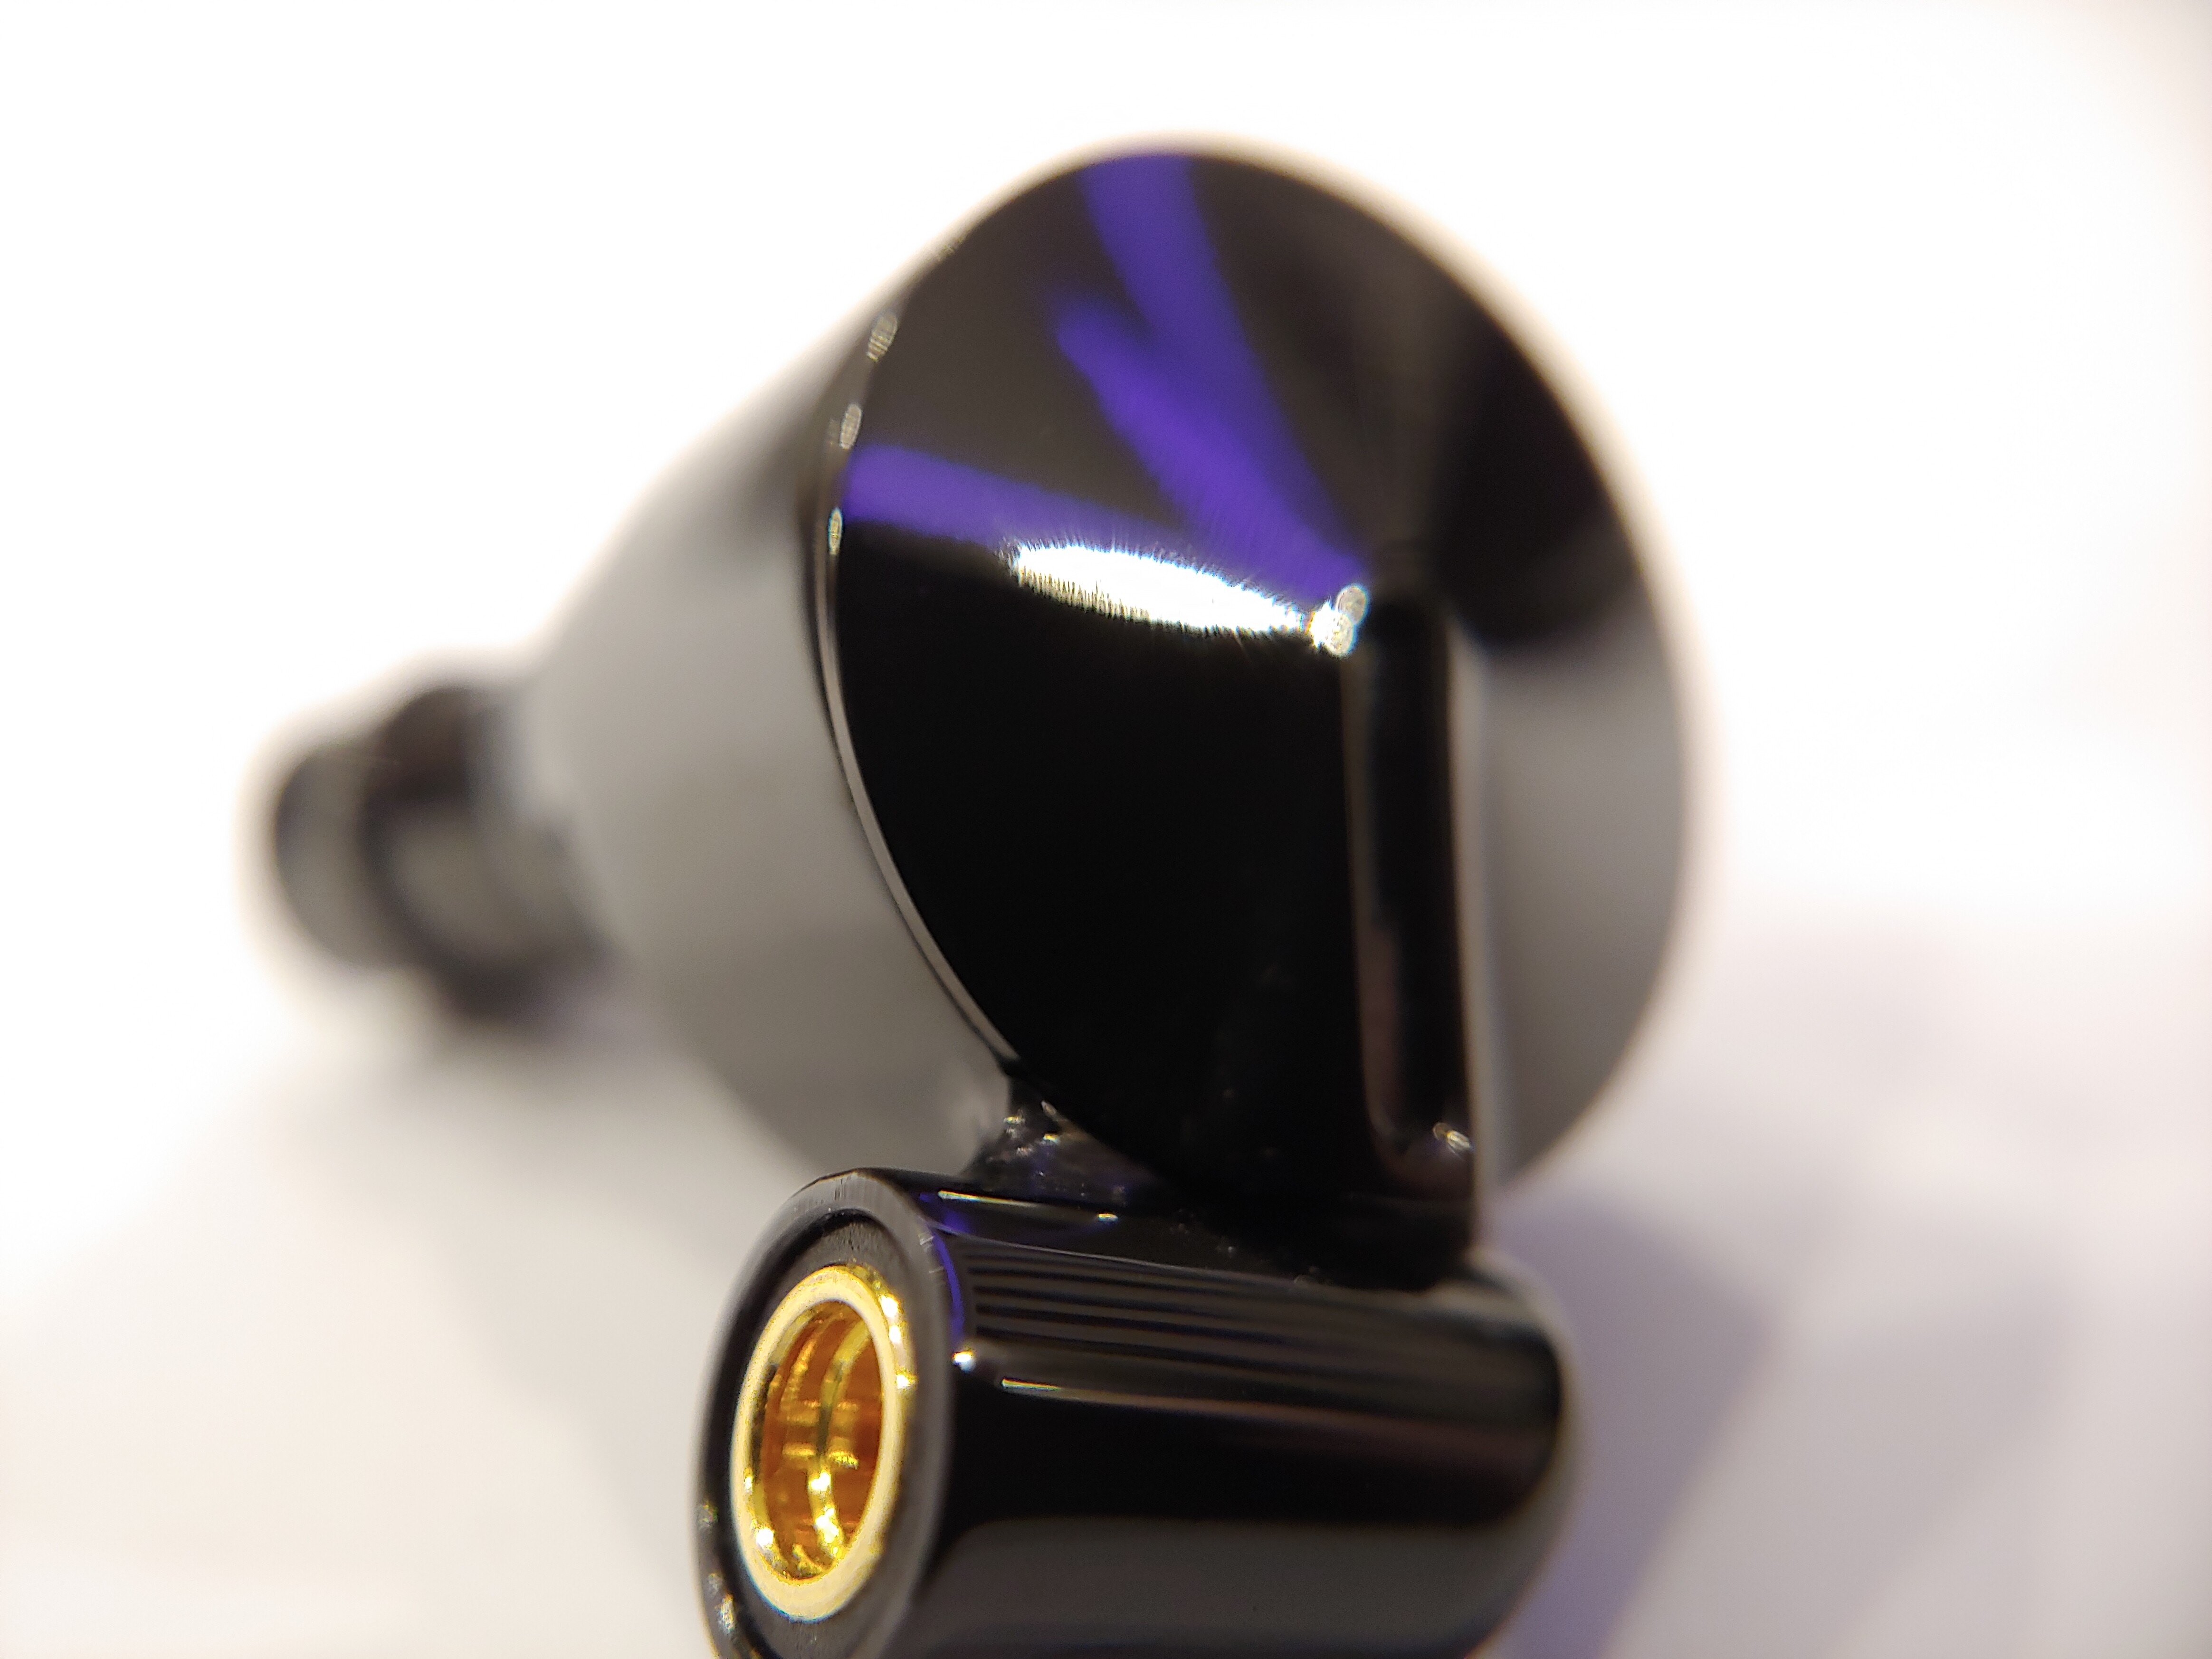
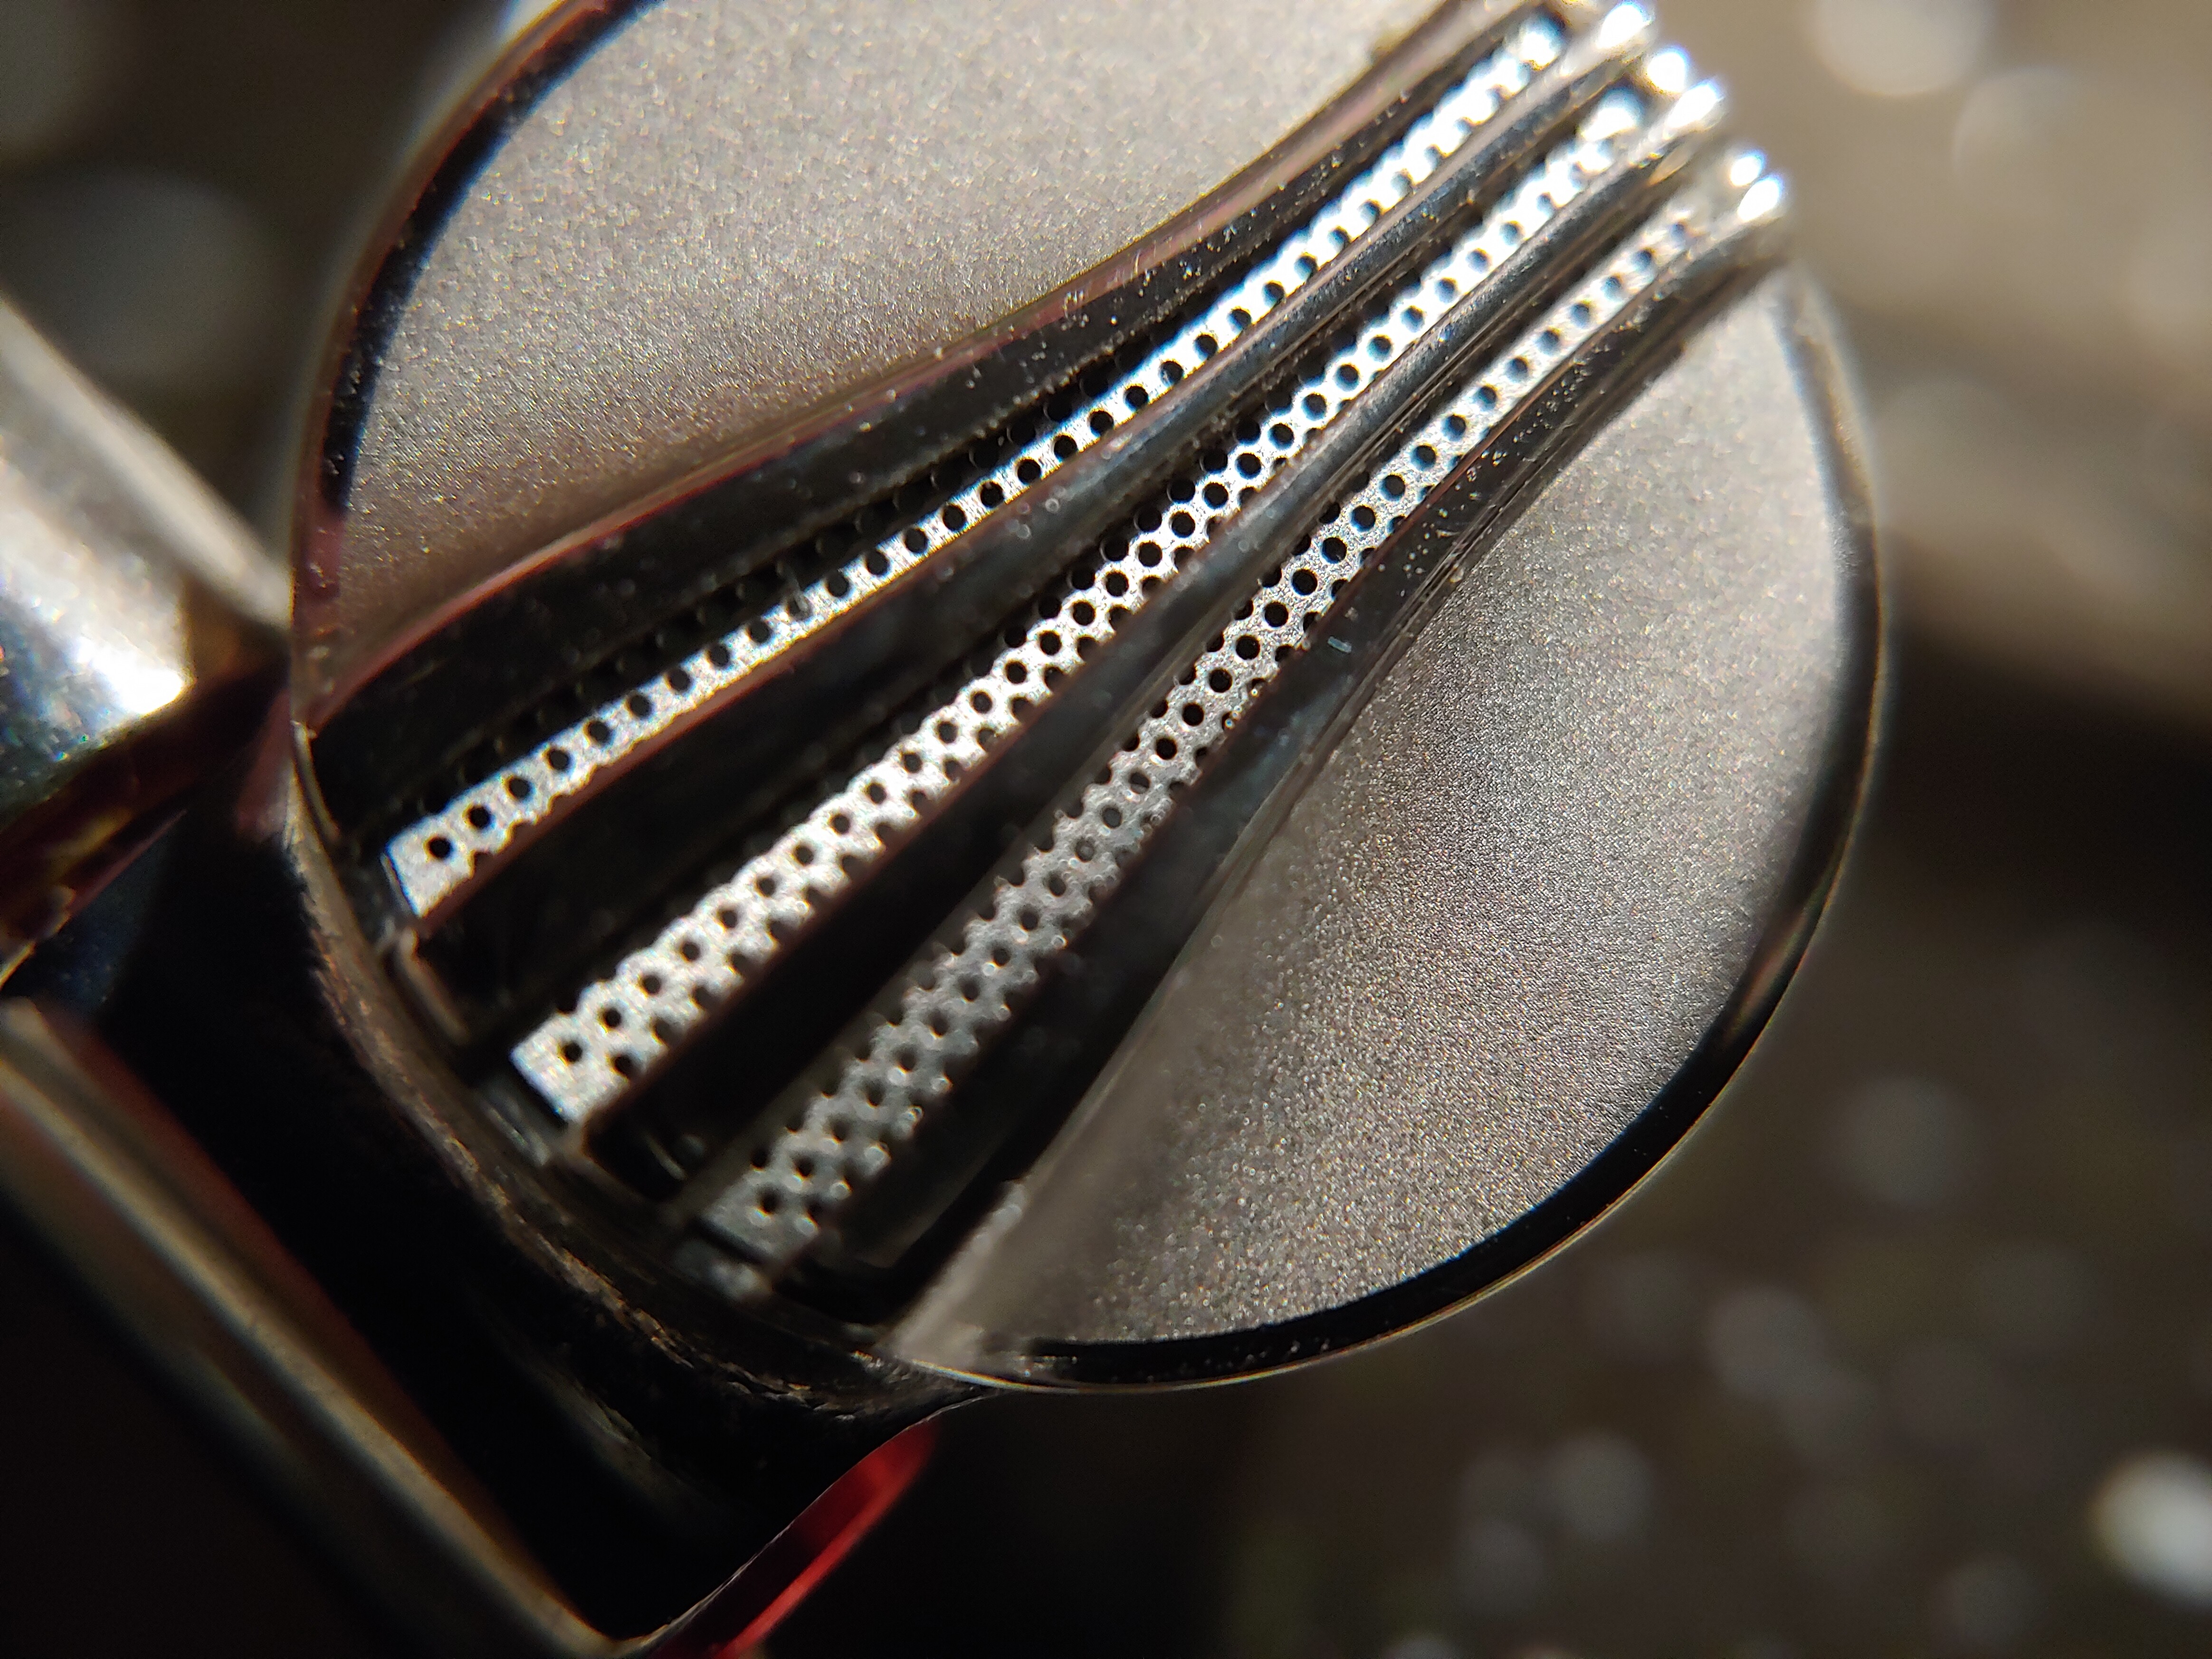
Lighting - I like the lighting, you can see the detail of the items the little holes and you have a nice rim light emphasizing the shape of the iem, here are some tips for next time.

  1. Rim light - you did great but the rim is slightly too strong, its so bright that the eye is drawn to it while you want most of the focus on other parts of the image
  2. “fill” - while the iem is over fairly well lit i think a lot of details in the right side of the center, are too dark ( the hole on the lefts look great but it looks too dark on the right), so a neat little trick is taking a small piece of paper or cardboard (White only!) and using it to reflect some of the light back into the iem, it makes a very tiny difference but it can add that little bit of light to the dark parts)
  3. Background - the overall tone/colors of the images is very “cold” and metallic, now for this IEM it works because of its build but other items like stuff made from resin or plastic might not work as well, so see if you can throw a bit of color with a light, similar to what @init did with the colors of the keyboard, again think of a color that works with iem

Angle - I like the angle you can see the whole iem, it’s a good use of the macro lens but the depth of field is slightly too narrow, meaning how much is actually in focus, i think its a little too blurred out, the stem and the back portion of the iem are still part of the iem and you don’t want it too blurred out, you still to need to make out the overall shape. now there are a number of ways to fix that

Reposition the iem / shoot from a different angle
now, this is less ideal in a lot of cases because it limits your creative ability, but you can google how the plain of focus works on a camera just to know what and how that works just to use when you want it.

Manual control
if you have a “Pro” mode in your phone you can adjust the aperture of the lens, that will give you more a deeper depth of field meaning more will be in focus. the aperture measured in F stops, the higher the number the more in focus you will have, but keep in mind that you will need more light. (there is a whole technical thing i wount get into here)

Take a step back
If you take a small step back and then crop the image the difference in depth of field will be noticeable, it has to do with a whole technical thing that i won’t get into but the short of it is: the closer you are to an object the less you have things in focus (its relative to the distance between you the object and the background)

Post: Focus stacking - not advised
Focus stacking is a trick that a lot of macro photographers use, basically you take several images at different points of focus, and merge them together. In this case - this would be the first shot then another would be where the focus is on the body of the iem and the last would be on the stem, and in photoshoot you can merge them together. Now this might sound ideal but its the most annoying and hard to pull off well.

Overall "feel"
Like i said the overall colors of the items and the light feel very cold and metallic which works here, but a different set of iems might feel a bit strile in a bad way to try adding other elements even a bit of the wire coil on the side or back, or even a plant or something that has the same “tone” as the iem

1 Like

Thank you sensei.

I cant really change much when it comes to lighting but I will try around more with manual mode.
Unfortunately I do think the LG G7´s camera is pretty bad and is a factor in why the focus is pretty blurry. (or it could be both the G7 and my macro lens adapter: APEXEL Phone Lens 2 In 1 Clip On 12 X Macro + 24 X Super Macro Lens kit For Iphone 7/6s / 6s Plus ios android smartphones 24XM|phone lens|macro lenssuper macro lens - AliExpress )

I perefer to refered as “BIG CHIEF” or “that one dude that shoot naked women”… :smiley: :smiley:

anyway…

Even if its natural light you can still “tone” the lighting down. you can use any translucent material to tone down the light from that area, like tracing paper of a baking sheet that would sit just outside the frame, works great.

As far as the lack of depth of field its not a “bad thing” its just something you need to control a bit more, and its part of the package deal, it take a while to really get the hang off so feel free to experiment. Product photography is practically hard because its so technical

1 Like

Any tips on contrast between iem and table?

For example, with silver iems, should I ideally take pictures on them with a black table? And with a black iem with a white table?

I did something like that with my Dunu Zen


Different spot than my previous picture and it is a black table. I just put a few sheets of white paper under it lol. Since I believe that having a black iem + black background isnt very good for contrast.

you can actually do something in between, use the white paper but take the light source you have and limit it with cardboard basiclly limiting what it does and doesnt hit.

I hopefully this doesn’t get me in to trouble with the mods but ill show you and example of what i mean.
this is something a shot around end of 2018

and here is the behind the scnes


See that large black thing on the right? its basically blocking all the light coming from the right aside from a very small slit that hit the side of the model’s body - That’s rim lighting.
Using stuff to block or reflect light is a great tool to know and the best part its cheap :smiley:
but it takes a lot of trial and error

4 Likes

Thats a pretty large scale modification lol.

Ya but the same principle works to everything, but it takes a lot of trial and error to do it on a very small scale because its a millimeter here or there, while work with a live person its much more forgiving (though that person might not be as forgiving :smiley: )

1 Like

New submissions:

I think that the second one looks better, all I did was rotate the iem so the lighting hit it in a different angle.

1 Like

These are awesome. I love those glowing tubes! So beautiful.

1 Like

The second shot looks pretty good in comparison to your first shot. The lighting was blown out in that shot. This second shot, you can see the textural detail on the face of the FD5.

1 Like

I still feel like my camera is responsible for a lot of the issues. Anything besides perfect ligthing is just average lol…

Have you tried improving some colors/balance etc. in software?

Indoor macro photography is difficult because you’re covering up the product with your body and the camera blocking light/casting shadow on the subject.

I’m afraid I’ve got bad news for you - I use a Fuji GFX50R and product shots come out pretty meh anyway. Unless I get the lighting perfect :slight_smile:

1 Like

Nope, I leave it up to auto mode lol.

(on that note, I have heard that the google camera is better than LG´s own camera app lol.)

If your phone can do RAW files, you can try free Darktable https://www.darktable.org/ software. I use this and I really like the effects.

It can (same with pretty much all android phones). Aside from editing, is RAW files better than JPG in quality? (like mp3 vs flac lol.)

It is a good analogy, yes. It’s uncompressed file. It doesn’t have any “processing” it is just an array of data from the digital camera, all pixels information.
You need to “develop” the picture from it, kind of like it’s used to be:

At the time of developing a picture you have to manually adjust things like color temperature etc. The defaults the software is proposing may end up in actually ‘worse’ picture than just a quick JPG straight form your camera so it will take more time to “develop” a picture from raw than just make a JPG automatically.
Also raw files are noticeably larger in size.

1 Like

“Don’t blame the tools, blame the operator.”

If it was as simple as pointing an expensive camera in the right direction, photography would be way easier.

Lighting is important. Natural light is nice and all, but sometimes you need to help out a bit.
I started with my dads halogen spotlight, after burning my hands a few times, I got a pair of cheap white LED spots. Not photography lights, just standard stage LED spotlights.

2 Likes

A couple of principles at play regarding this comment:

1) Lighting for almost any subject matter most often looks better when it’s off-axis from the camera itself. So if you’re blocking the light with your camera and personage, then it’s highly likely you could make a better image by having your light source come from some direction other than behind you or over your shoulder.

2) There’s no rule that says you have to light your subject matter directly. Especially so with still life/product shots. You can place something like simple pieces of white foam core board or poster board out of frame, shine your light into them, and then use the light reflected off the board as the actual light source on your subject.

2.related) This is a technique that’s fairly common for controlling the specular highlights on small/compact shiny objects. You place pieces of foam core so that their white reflection is seen on the object where you want the specular highlight, and then go about lighting that piece of foam core lighter/darker to achieve the “shiny edge” highlight look you want.

3 Likes